VIBRATION ACCELEROMETERS CALIBRATION
VIBRATION ACCELEROMETERS CALIBRATION
Under normal conditions, piezoelectric sensors are extremely stable and their calibrated performance characteristics do not change over time. However, often sensors are exposed to harsh environmental conditions, like mechanical shock, temperature changes, humidity etc. Therefore it is recommended to establish a recalibration cycle. For applications where high accuracy is required, we recommend to recalibrate the accelerometer every time after use under severe conditions or at least every 2 years. In some less critical applications, for example in machine monitoring, recalibration may be unnecessary.

1/ What is calibration?
Calibration is the process of eliminating or minimizing factors that cause inaccurate measurements is a fundamental aspect of instrumentation design and configuring an instrument to provide a result for a sample within an acceptable range.
The results are used to establish a relationship between the measurement technique used by the instrument and the known values. The process in essence “teaches” the instrument to produce results that are more accurate than those that would occur otherwise.
2/ How do we calibrate vibration accelerometers?
If no calibrator is at hand, a measuring chain can be calibrated electrically either by
- Adjusting the amplifier gain to the stated accelerometer sensitivity.
- Typing in the stated sensitivity when using a PC based data acquisition system.
- Replacing the accelerometer by a generator signal and measuring the equivalent magnitude.
Understand the limitations of transducer calibration.
ISO 16063-21 gives some attainable uncertainties for the calibration of magnitudes and phase angles:
| Parameter | Calibration under well-controlled laboratory conditions | Calibration with reduced accuracy requirements (e.g. with portable calibrators) |
| Amplitude (0.1 – 1000 m/s²) | ||
| accelerometers 0.4 – 1000 Hz | 1 % | 3 % |
| accelerometers 1- 2 kHz | 2 % | 5 % |
| accelerometers 2 – 10 kHz | 3 % | 10 % |
| velocity and displacement sensors (20 – 1000 Hz) | 4 % | 6 % |
| Phase shift | ||
| at calibration amplitude and frequency of the reference transducer | 1 ° | 3° |
| outside reference conditions | 2.5 ° | 5 ° |
Recommended calibration frequencies to ISO 16063-21 are 8, 16, 40, 80 and 160 Hz at amplitudes of 1, 2, 5, 10, 20, 50 and 100 m/s² (RMS).
3/ Errors which occur with acclerometers
For the evaluation of measuring results it is very important to assess all measuring errors. The following three groups of errors occur with piezoelectric accelerometers:
- Sensitivity Errors: Calibration errors, linearity errors, frequency and phase response errors, aging errors, temperature coefficients
- Coupling Errors: Influence of transducer weight, quality of the coupling surfaces, transverse sensitivity
- Noise and Environmental Influences: Noise, base strain, magnetic fields, temperature transients, sound pressure, cable motion, electromagnetic interference in cables, triboelectric effect in cables
Systematical errors can be corrected arithmetically if their process of formation is known. The effect of these errors has been diminished and well described by the manufacturer.
Most of the systematical errors can be neglected if the measuring results are compared with another measurement under similar environmental conditions. This is of particular importance for unknown and undescribed systematical errors.
Most errors, however, will occur accidentally in an unpredictable manner. They cannot be compensated by a simple mathematical model since their amount and their process of formation are unknown.
For practical measurements, systematical errors and accidental errors are combined in one quantity called measuring uncertainty.
The following example illustrates the contribution of several error components and their typical amounts:
Accelerometer:
- Basic error 2 %
- Frequency error (band limits at 5 % deviation) 5 %
- Frequency error (band limits at 5 % deviation) 5 %
- External influences 5 %
Instrument with RMS calculation:
- Basic error 1 %
- Frequency error (band limits at 5 % deviation) 5 %
- Linearity error 1 %
- Waveform error 1 %
An uncertainty better than 10 % can only be reached if all relevant error sources are considered and if the used measuring equipment is of good quality.
4/ Vibration calibrators
For recalibration the transducer can be sent back to Metra. Our calibration service is based on a transfer standard which is regularly checked at Physikalisch-Technische Bundesanstalt (PTB).

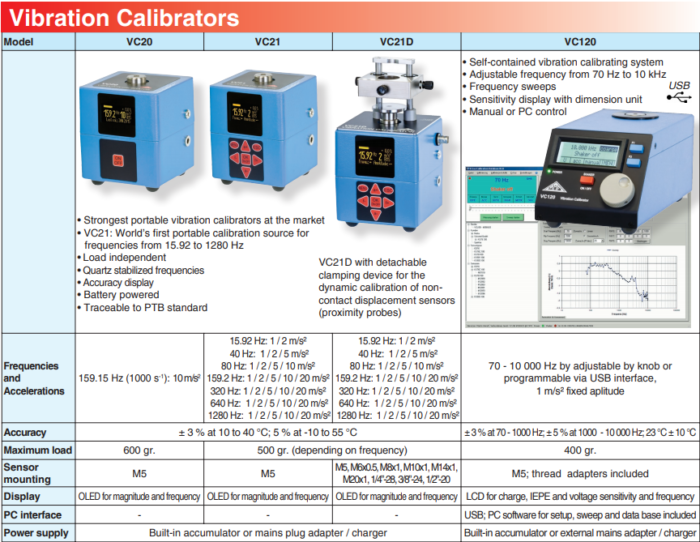
Many companies choose to purchase own calibration equipment to perform recalibration themselves. This may save calibration cost, particularly if a larger number of transducers is in use. It may also be desirable to calibrate the vibration sensor including all measuring instruments as a complete chain by means of a constant vibration signal. This can be performed using a Vibration Calibrator of Metra’s VC2x series. The VC20 calibrator supplies a constant vibration of 10 m/s² acceleration, 10 mm/s velocity, and 10 µm displacement at 159.2 Hz controlled by an internal quartz generator. The frequency of model VC21 can be selected in seven steps from 15.92 to 1280 Hz. The VC110 Vibration Calibrating System has an adjustable vibration frequency between 70 and 10,000 Hz at 1 m/s² vibration level. It can be controlled by a PC software. An LCD display shows the sensitivity of the sensor to be calibrated. The VC110 is also suitable for measuring frequency sweeps.
